Yesterday, I finished a baby blanket made out of my husband's ripped jeans and a few of his old button-down shirts. Here's the finished product:
A much larger version of this blanket currently covers my own bed. I had to save nearly 20 pairs of my family's jeans in high school in order to have enough material for a queen size. When it was finished, I decided to use the extra pieces to make a little pillow.
When guests see our bedroom, many ask how the blanket and pillow were made.
So, here's a little tutorial for a simple 4x4 design:
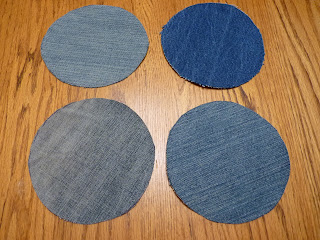
Use a circular object to trace and cut several pairs of jeans into standard size circles. I used a small bowl. The circles you see here are about five inches in diameter.
Cut a piece of paper into a square that inscribes the circles. Use the paper to trace squares on the inside of your jeans.
Take two of the circles and line them up back-to-back. The squares should be facing out, and the sides and corners of the squares should be lined up. Sew along one of the square sides.
You will be left with little flaps of extra fabric. Depending on how large you want your project to be, you will continue to sew the sides of the squares together until you have several long chains of circles.
Now you're ready to sew the long strips together. Use the remaining lines of the squares to carefully line up your pieces and sew the chains of circles to each other.
This will create a lovely little flower design with the extra flaps of fabric.
Now cut little squares from some other fabric. I used my husband's old shirts. The squares should be about the same size as the ones you drew on the jean circles. However, I have found that cutting them slightly smaller works just fine, too.
These little squares are going to lay inside the extra flaps of jeans fabric (are you starting to visualize the finished product?). Sewing these flaps down takes a few steps. First, you are going to anchor down the flaps and square fabric with long, straight seams.
Just make sure that you carefully hold down the flaps as you're sewing so that all of the fabric lays flat.
Continue to sew straight lines for all the vertical strips. Repeat the same process going horizontally.
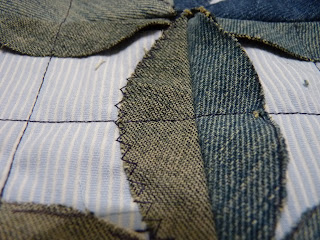
With all your squares and flaps anchored down, it's on to zig-zagging! Starting at one end of your project, you will follow the edges of the flaps with a zig-zag stitch.
The finished zig-zag will look like this. Repeat the zig-zagging for all the flap edges, both vertically and horizontally.
Here's one side of the finished zig-zags.
And here's the other side. Notice how the zig-zag stitching is not perfectly symmetrical. Some of my zig-zags are more evenly spaced than others, too. That's the charm of homemade!
And that's your finished project! If you're wondering how many circles you'll need to create these project, here's how many I used:
Baby blanket: 11 by 13 (143 total jeans circles)
Queen size blanket: 25 by 25 (625 jeans circles - start saving jeans now!)
Pillow (one side): 5 by 5 (25 jeans circles)
Now if Jadon would just make up his mind on a birthday, we could put this blanket to use!


Very nice and simply explained!
ReplyDeleteso beautiful, totally inspired me to start my own with my saved Jeans pile x
ReplyDeleteI so LOVE this idea!! Great Work!!
ReplyDeleteQuestions, most of the jeans I have saved up for a quilt project are stretch demi, will they work
ReplyDeleteI would like to use stretch denim too
DeleteExcellent explanation and images. thank you
ReplyDeleteI have a box of all my dad's jeans. He has been gone for several years now and I've just been looking for a project for these jeans. I think this might be it!
ReplyDeleteThis is lovely!! I was wondering if it would be possible/practical to add a square of batting underneath the fabric square to increase the warmth of the quilt. Would this perhaps make it look too “bubbly?”
ReplyDeleteYes, you can! It gives it a little more weight to keep warm as a throw. It feels and looks better, too. I sew my fabric square and circles together in one step. Just use spray fabric adhesive to the fabric square and it holds so you you can sew the circles and the fabric squares that are in the circles all at one time.
DeleteI have slept under denim quilts and they tend to be quite heavy. You might consider that first.
ReplyDeleteThese are great instructions, thank you! I was wondering, are there other fabrics that i could use to make the circles? I have a collection of denim, but they they are earmarked for other projects :) I assume i would want something that was a bit weighty, but also would fray too much?
ReplyDeleteI just found this -- it's gorgeous! I hope baby arrived and is now growing strong and tall as this post is a few years old!
ReplyDeleteMy question: would this work with leftover cottons? Or is all the sewing too much for lighter material than old jeans?
Beautifully explained. All my doubts got cleared. Wanna know if you can use something other than denim
ReplyDeletetres beau
ReplyDeleteHi, I first saw this ''Double Wedding Ring'' pattern in a youtube video by Kaye Wood. The tutorial was by Cheryl Phillips (https://www.youtube.com/watch?v=G-H6GAsqNus). I just finished it and it was a bit of a challenge, I have to say... but I love this quilt.
ReplyDeleteMade placemat using this idea…love it and going to make more! Thanks
ReplyDeleteThank you! I understand how to sew this pattern now....
ReplyDelete