Thursday, November 14, 2013

Preparing to Share a VBAC Homebirth Journey

Hello second trimester! I’m 14 weeks pregnant this week!


As the reality of a new pregnancy sets in, I can't help but reflect on my only other pregnancy. When I found out that I was pregnant with Jadon, I knew that I wanted a "natural" birth, but I didn't really know all that it would involve. I expected to take my prenatal vitamins, attend a childbirth class, and do my best to refuse pain medications during labor. I dutifully scheduled my doctor visits, watched what I ate, and avoided fumes and other pregnancy no-no's.

Little did I know, my "natural" vision would lead my husband and I to Bradley classes, a Weston Price inspired diet, and midwife interviews! When I was six months pregnant, we hired a midwife in preparation for birthing Jadon at home. At the time, I wasn't sure what people would say in response to our decision, so I wasn't zealous about advertising our home birth preparations. I needed all the positive support I could get, especially being a first time mom-to-be.

Only God knew that our plans would change dramatically during Jadon's labor. Jadon turned breech after my water broke. We discovered his positioning after about four hours of contractions at home. At seven centimeters dilated, I decided that we should transfer to our back-up hospital, where was Jadon born via c-section. Even though it was vastly different than the home birth I planned for, my c-section was a wonderfully positive experience. You can read the entire birth story here.

Shortly after Jadon was born, I remember talking with my midwife about future home birth options. I didn't know if a previous c-section would automatically disqualify me from the "low-risk" status required for home birth candidates. I remember her explaining that I needed adequate time to heal (18 months), and a consulting doctor, in order to pursue a home birth VBAC (Vaginal Birth After C-section). My husband and I resolved to wait 18 months before trying for a second child.

Imagine our surprise when I discovered I was pregnant about a year after my c-section! I was thrilled with the news, but thought, Oh well, I guess we'll have to try for a home birth with our third child! A few days later, and six weeks pregnant, I was a little more down about the prospects of another hospital birth, so I decided to call our midwife, just to see what she had to say.

My spirits revived upon hearing that we needed to wait 18 months between a c-section and the BIRTH, not a c-section and the CONCEPTION of a second child. Jadon and Baby #2 are going to be over 20 months apart, so we made the cutoff! My midwife congratulated me and shared how happy she was to support us in our VBAC journey. We discussed the next steps I needed to take, primarily setting up my first appointments with her and a consulting doctor.

The first appointment with my midwife and her apprentice was like having a reunion party. I was eight weeks pregnant and so happy to see these women again. After talking and catching up on each others' lives, we finally got down to business. We updated my paper work, discussed the financial agreement, and determined the estimated date of delivery (May 14! This just got real!). We also talked about any concerns I had in this pregnancy. My one and only concern centers around the fact that I have been through labor, but never actually pushed a baby out of my body! In this way, my second birth will be like I'm experiencing labor for the first time. We agreed to address my expectations, the mechanics, and the optimal healing process for vaginal birth in the coming months.

In the case of a VBAC, a consulting doctor is required for a Wisconsin licensed midwife to assist with a birth. That way, if any risky complications arise during pregnancy (that rule out home birth as a safe option), you have a medical professional that is familiar with you, your pregnancy, and your wishes. Granted, some doctors are not in favor of home births at all, and would not want to be the "back-up" option. Luckily, I had been keeping my ears open for a "home birth friendly" doctor, and I knew who I wanted to meet with.

Dr. W was recommended to me by two close friends of mine. One of these friends used him as a consulting doctor for her home birth. She reported that he was very accommodating of her home birth plans, and did not pressure her to consider the “safer” hospital option. I wasn’t sure if he would be as flexible with a home birth VBAC, however. I figured that the words “uterine rupture” would come up in the very least. 

But I know the statistics about VBACS. Uterine ruptures occur in 0.07% of ALL births. That number rises to about 0.5% in VBAC births (check out this article for more information on uterine ruptures), and I am considered very low risk for uterine rupture. Furthermore, about 75% of women who attempt a VBAC are successful. Your chances of success increase if you have a low transverse incision, and if your uterus was stitched up with a double layer uterine closure (check, and check!). Furthermore, if you maintain a healthy weight, begin labor naturally, and have a doula, you are more likely to avoid a repeat c-section. All of these factors were true of my first pregnancy and labor, and I plan on keeping it that way this time around. 


You are also more likely to have a successful VBAC if the reason for your c-section is not present in the later pregnancy. You hear that Baby #2? Keep that head DOWN!

Thursday, September 12, 2013

Cloth Wipes: New and Improved!

I've been cloth diapering for over a year now, and my first set of cloth wipes are looking pretty shabby. In particular, the serged edges are fraying, especially on the corners. I was so excited about the serged edges originally, but now I think french seams are the way to go for cloth wipes.

French seam picture taken from tutorial found here.
I've also found that my original terry cloth layer (just old towels) makes my current cloth wipes unnecessarily bulky. I thought I would need a lot of texture to clean up those really messy newborn poops, but the flannel layer really is more than adequate for the job.

Needless to say, I'm replacing my old wipes with new ones. In order to make these new and improved cloth wipes, the beginning is the same: cut out your fabric. I decided to use two layers of flannel this time, cut eight inches by eight inches.


With two squares of flannel facing each other, I sewed a single seam around three edges of the square. Next, I trimmed the two corners at the bottom of the "pocket" I created. *Important note: DON'T do any back-stitching at the beginning or end of your seam; you need these threads to be nice and loose later!*


Then, I turned the "pocket" inside-out, revealing the "right" sides of the fabric. Now I began the second step of the french seam. After carefully rolling out the outermost edge of the seam with my fingers, I placed my fabric under the sewing machine needle. Notice that I started my second seam about 1.5 inches away from the opening of my "pocket."


Before I reached the end of my third edge, I stopped the machine and sunk the needle into the fabric to hold my place. Next, I carefully pulled apart the end threads. I folded the flannel fabrics in on themselves, and then flattened them against each other. Going SLOWLY, I continued my seam until I had a few stitches through all four layers of folded flannel.


Leaving my needle in the fabric again, I lifted the pressure foot, and turned the fabric so that I was ready for my final seam. It was time to close the "pocket." I continued to fold in the edges of the flannel and sew through all four layers until I was close to the other end. Then, I repeated the folding and flattening, just as I had done for the other corner.


After turning the fabric one more time, I finally reached my starting point. I finished by back-stitching and forward-stitching several times.


These wipes are so much more durable than my serged ones!  I love playing around with the color and pattern combinations of all my flannel fabrics. They would also make great reusable napkins for home or lunchboxes. I think I might make some for my little kitchen messes. They are so cute and functional, I just can't stop making them...what, did somebody say upcoming Etsy shop?

*wink wink*

Wednesday, September 4, 2013

Jadon's First Birthday!

Jadon turned one this week! I can't believe that our homebirth-turned-c-section story happened a whole year ago. He has grown up so much, and Jon and I couldn't be prouder parents. We celebrated with friends and family on Labor Day, but Jadon was pretty oblivious to the milestone he reached.

My favorite part of the party was sharing a video I made of Jadon's first year of life. I can't believe how much he's grown and changed in just one year. You can watch the video below!


Though it was not a "Pinterest-perfect" party by any means, I decided to theme his party around one of his favorite books from this year, The Very Hungry Caterpillar. I asked the guests to bring a food item from the book, and my decorations were littered with book references. Of course, I had been anticipating this special day with a few homemade projects for Jadon's party.

Because I managed to find some "hungry caterpillar" stickers at a thrift store (score!), I looked for ways to use them. The stickers ended up on party cups, a sign for our front door, and a homemade garland.


In order to make this garland, I first cut out circles from extra scrapbook paper I had saved from another project. Then, I ran them through my sewing machine. I knew you could sew paper because of my cloth bags project from a few months ago. Finally, I stuck the stickers on the non-colored side of the paper (okay, a friend helped with all the stickers...thank you, Kelly!).

I also made a mini garland to decorate Jadon's chocolate cake. All I did was trace small circles onto patterned cardstock paper to cut them out. Then, I sandwiched a piece of string between two of the circles, and glued them to each other. In retrospect, I would have also sewn these, but I wanted to try another method of making the garland. Sewing is faster and cleaner. I also like how the thin threads seem to disappear when you step back.


Of course, a red circle, followed by several green circles, resembles the caterpillar from the book. I tied the ends of my string to a couple of chopsticks and stuck them in my brownie cake. Done and done. I love that this decoration saved me the hassle of icing the cake. I just wasn't up to the pressure of trying to make frosting look good for this party!

"On Saturday, he ate through...a piece of chocolate cake..."
I also decided to make something special for Jadon to wear. I created a simple hungry caterpillar shirt with buttons and fabric.


I started by ironing some scrap interfacing to the back of some extra green fabric from my "leftovers" stash. Then, I drew a leaf onto the interfacing to cut out. Next, I picked out my combination of red and green (and tiny yellow!) buttons for my caterpillar. After hand sewing the buttons to my leaf, I pinned the leaf to my grey onesie (it had a hideous design underneath that I simply had to cover up!). Then, while carefully holding the rest of the onesie out of the way, I zig-zag stitched around the edge of my leaf with green thread to anchor it to the shirt.

"Jadon, when are you gonna grow hair?"
This is one of the only pictures I took during the party, and the best shot of Jadon in his shirt. The end result was exactly what I envisioned. Jadon was very curious about the new feature of buttons on his shirt. He eventually managed to rip one off! I have to sew that one back on and figure out how to keep the yellow eyes laying flat (you can see how they can shift and overlap in the picture above).

I'm glad the onesie is a size too big for now so that he can wear it for a few more months. He's growing too fast for me to keep up these days!

Saturday, August 31, 2013

Nearing the End of Summer...

It's hard to believe that the end of August is upon us, isn't it? A year ago at this time, I had just started this blog. I was still pregnant, waiting excitedly for Jadon's arrival.

Our friend Laura did a fantastic job on Jadon's one year pictures! Check out her website!
These days, my baby is a baby no longer! Jadon RUNS everywhere, climbs couches, and loves to find me when I hide. He signs "more," "please," "milk," and "all done,"  and eats anything I put in front of him. He waves to everyone we pass in stores, and often adds an enthusiastic "Hi!" at the end. Jadon likes to imitate me by pretending to water my tomato plants, stir empty bowls, or sweep under his highchair. He still sleeps in our room, but on a small mattress on the floor next to our bed. His favorite things include baths, books, walks, books, kids, and did I say books? He will sit on my lap and listen to me read for as long as I'll stay on the floor (often crying dramatically when I stop).

Life with a one-year old keeps me busy, but I always find time for other tasks. Here's just a few summer project updates:

New and improved cloth wipes. I'm working on several sets of cloth wipes and a new tutorial to go along with them. My original tutorial has been one of my most popular posts this year (thanks to Pinterest!).


Kombucha. My original scoby has multiplied itself several times over by now. Halfway though the summer, I even had enough of a culture to have two jars of kombucha brewing at once! If you want to make kombucha for yourself, check out my tutorial.


Chevron Crocheted Blanket. My little sister got married this month! I snooped on her Pinterest boards for some homemade gift ideas, and got a lot of inspiration from some of her favorite color combinations, and the many chevron patterned items. I finally decided upon crocheting a chevron blanket for their new living room. I figured out the pattern all on my own, so I'm pretty proud of the way it turned out.


Cloth Diapering, etc. I couldn't resist adding another meme! I know that this isn't really a project, but cloth diapers continue to need washing every couple of days! I also started drying them on a line this summer since sunning diapers helps get stains out. I'm actually in the process of stripping my diapers right now since they were starting to have a lingering smell. Stripping gets out any lingering detergent that might not get rinsed out in the regular wash routine. Click here for more cloth diaper laughs.


And finally...

Jadon's birthday video. We're celebrating Jadon's birthday with family and friends in just a few days. I wanted to put together a 10-15 minute video of clips from the past year for everyone to watch. I figured I would average about a minute per month. However, this goal was a lot harder than expected due to the hours of video we've taken of Jadon in the past year! All the clips I ended up including are mostly between 5 and 10 seconds in length, but the video is still about 17 minutes long! I need to finalize it this weekend, and hope to share it soon!

Friday, August 23, 2013

Cloth Diapers for Mama? Mama Cloth!

Once you start cloth diapering, it's not long before you are exposed to all sorts of cloth replacements for disposable items. For example, some people start using cloth "paper" towels that are washed and reused. Others use "family cloth" instead of toilet paper. Reusable snack bags are becoming popular in favor of plastic baggies. And of course, cloth wipes are an obvious accessory to cloth diapering.


Click any of the three pictures above for links to their original sites!
Months ago, a friend asked me if I make "mama cloth." I hadn't heard of them yet, so I looked it up and couldn't believe all the styles (just look at this google image search). As it turns out, some women ditch their disposable monthly feminine products for cloth pads, affectionately known as "mama cloth." I was intrigued, not only because they were really cute, but because it reminded me that women of the past must have used some cloth version of pads before the disposable ones were around.

Imagine trying to use one of these beauties!

I looked at a few online tutorials and came up with my own version of mama cloth for my friend. Then, I made a whole stash for myself. I couldn't resist. Is it weird that I actually looked forward to my next visit from Aunt Flo so I could try them out?

Making your own mama cloth is easy and inexpensive, especially if you repurpose fabric that you already own. To start, you have to design a simple pattern. I made mine with a disposable pad as a model.


First, I traced the pad onto a simple paper grocery bag (my favorite choice for pattern material). Then, I held the pad perpendicular to the tracing, and marked where the ends of the pads landed. After setting the pad aside, I drew concave curved lines to connect the tracings. This pattern will be used to cut the outer layers of the mama cloth. You will also need a pattern for the inner absorbent layers, which is just an outline of the model pad.


Use your pattern to cut out two pieces of flannel (I used old receiving blankets). I recommend having two different colors/patterns on your flannel so you can remember which side is the absorbent side. With the "right" side of the flannels facing in, sew a seam around the edge of the two pieces, remembering to leave a small gap (about 3 inches) for inserting your inner layers. Flip this "pocket" you created inside-out.


Next, cut out your inner layers. You have a LOT of fabric options for this part. You can use t-shirts, towels, washcloths, flannel, or combinations of these fabrics to create your absorbent layer. I also like to include a waterproof layer so I don't have to worry about any leaking. Some people use fleece or wool for waterproofing their cloth diapers, but I don't know how they would work for mama cloth. I chose an unused super-shammy (why not?) as my absorbent material, with a backing of PUL (same material used for cloth diaper covers) to make my mama cloth waterproof.

Whatever materials you choose, sew them to each other so that they stay together. I ran a seam around the middle of my oval. Then, insert your inner layers into your outer "pocket."


Now you have to close the gap you left open. Tuck in the edges of the two flannel fabrics and pin them to each other. Before sewing the gap closed, I like to sew all the way through my inner and outer layers. Since you can't really see what you're sewing, you have to feel for the edges inside to make sure your seams actually go through the fabrics.


Next, sew a seam around the outermost edge of your flannel fabrics. This seam not only closes the gap, but keeps your flannel fabrics from shifting too much when they are worn and washed.


Finally, add your closures of choice. I like snaps, but some people prefer Velcro.

I LOVE my new mama cloth stash for several reasons:
1. They are much more comfortable than disposable pads. I don't feel like I'm wearing a mini diaper.
2. They are WAY more cute than disposable pads.
3. They don't shift around at all because the flannel is not a slippery fabric against cotton underwear.
4. They fold up nice and small for travel and storage.
5. They have the same wash routine as my cloth diapers, so I just toss them in the same load with my diapers!
6. I don't have to buy pads month after month...or worry about running out!

Needless to say, I don't think I'm ever going back.

Thursday, August 8, 2013

Breastfeeding According to the Facebook

I'm frequently on my smart phone while nursing, so I get a lot of time to browse Pinterest and Facebook. I often save pictures and sayings that I find amusing, most of which center around motherhood. In honor of World Breastfeeding week, I thought I'd share some of the hilarious breastfeeding memes I've collected over the past few months. Enjoy!


Wednesday, July 31, 2013

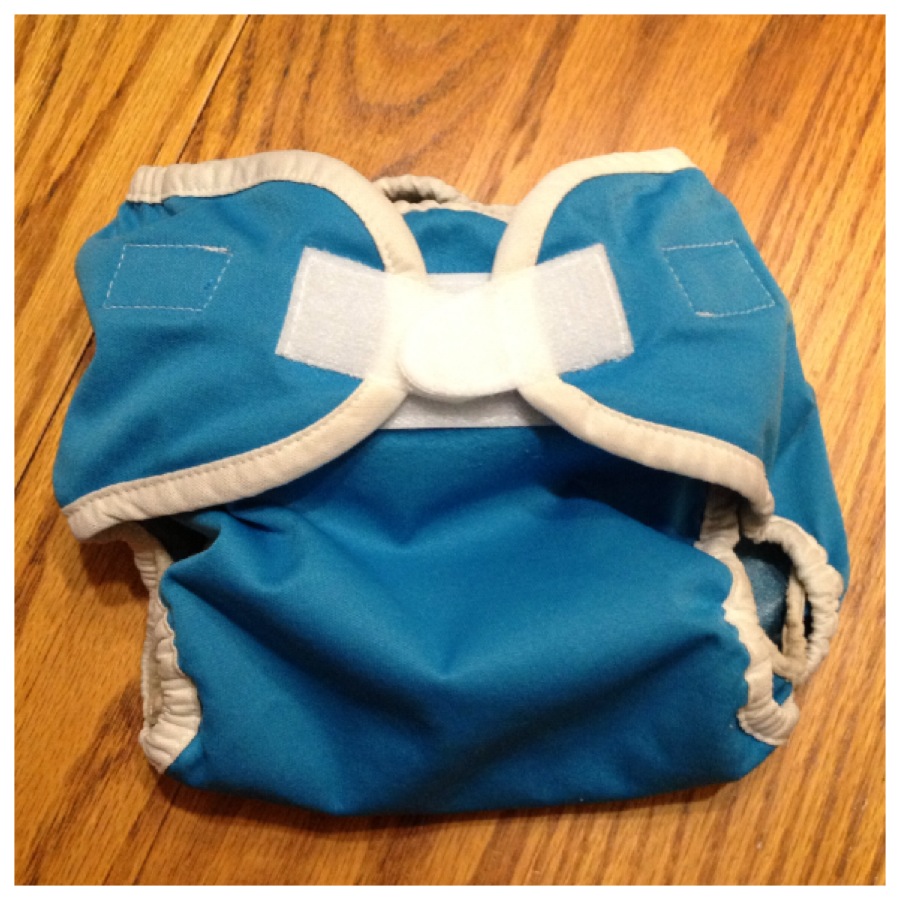
Cloth Diaper Tutorial: How to Replace Worn Velcro

When it comes to closing cloth diapers, I much prefer snaps for their longevity and baby-proof clasp. However, some people love the ease and speed of diaper changes with Velcro closures. Squirmy babies usually don't want to hang around for snaps to be connected. Unfortunately, with months of use, Velcro "hooks"  inevitably no longer stick to the "loops," and the diaper is hard to keep closed (especially with curious baby hands that would love to rip the whole thing off!). 

When the Velcro goes bad, some parents throw up their hands and toss the diaper in the garbage. But, with basic sewing skills, and this tutorial, you can replace worn Velcro with little cost or hassle.

When Velcro starts to fray like this, it's only a matter of time before it won't hold.
The first step to replacing Velcro is to get the old stuff off. Use a seam ripper (or an X-Acto knife, like me!) to carefully cut the threads that bind the Velcro to your diaper cover.

The inside threads are easier to snip when you start your seam ripping
I find the seam ripping process much easier when I cut the threads on the opposite side of the Velcro first (the fluff tends to hide the stitches pretty well). Once you snip that first thread, you can gently tug the Velcro away from the fabric and cut the exposed threads. Keep snipping until you reach the edge of the diaper.

Carefully cut the threads that anchor down the bias tape to release the Velcro
When you reach the bias tape (white edging), you will find that the Velcro is tucked inside. You need to seam rip the thread sewn through the bias tape to release the old Velcro. If you flip the Velcro "inside out" (see pictures above), you should be able to expose some threads for snipping. Later, the new Velcro ends will be hidden away under this same bias tape.

Keep seam ripping until the front inside flap is completely free.
Once the Velcro strip is free, you need to turn your flip cover over. If the front inside flap is still tacked inside the bias tape, you have a little more seam ripping to do. The flap needs to be completely free in order to sew your new Velcro strip on.

For detailed instructions on seam ripping your front Velcro wings and laundry tabs, I already covered it in my Velcro to Snaps Tutorial. Check it out!

New Velcro pieces
Velcro comes in all shapes and sizes. Most cloth diapers have Velcro that is 1.5 inches wide. You should look for "sew-on" Velcro that is described as "soft." It will most likely come in two rolls, one of the "hook" tape, and one of the "loop" tape. Use your worn Velcro pieces as a guide for cutting your new Velcro (but purposely cut your long front strip an extra half inch or so - it's so annoying when the fabric shifts a little during sewing and you end up short!).

All set, and ready to sew...
I like to pin my Velcro in place before I sew since PUL fabric is a little difficult to work with. Make sure you tuck the bias tape behind the sewing machine needle AND that the front inside flap is folded out of the way before you begin sewing.

Go slow...it's easy to make a simple mistake if you go too fast.
Slowly follow the edge of your Velcro strip as you sew, taking the pins out along the way. Try to prevent the PUL fabric from stretching underneath the Velcro as you sew. When you reach the end, be careful not to sew through your bias tape; hold it out of the way. If you have any Velcro hanging off the end, trim it.

Front Velcro strip compete!
Repeat the same procedure on the opposite edge of your Velcro.

Reattach the bias tape
Next, sandwich the new Velcro inside the bias tape. Sew a seam through both sides of the bias tape with the cover tucked inside. If you can't seem to line up all the layers at once, sew two seams along the edge of the bias tape (one on the inside, one on the outside).

Laundry tabs are easy compared to the front strip!
Now for the laundry tabs. Simply place your new tab over the tab's stitching holes, and sew all away around the edges.

Prep your front Velcro "wings"
As for the little front Velcro "wings," you need to do a little prep before sewing them to your diaper. Place your "hook" and "loop" sides back-to-back, and sew a little arch on the end of the tab. This arch should not extend more than halfway down the tab.


Now you can sandwich the side wings of your cover inside the arched tab. Sew a rectangle, following the edge of the diaper on one side, and the edge of the Velcro on the other three sides.


Your diaper cover will now function as good as new once again! Don't throw away a perfectly good diaper that is so easy to repair...breathe new life into your diaper with some fresh Velcro!